
DIY Recycled Plant Pot

I've recently got into growing my own herbs. I bought loads of seeds and then didn't have enough pots to plant them in. Instead of buying more I set about making my own using things I already had in the house.

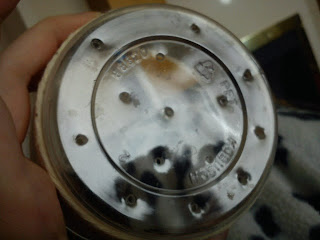
So I grabbed a plastic coleslaw pot before it disappeared off into the recycling bin. This pot had a lid which I could use as a 'dish' to place the pot on. Due to lots of plant preferring to be fed from the roots up I decided to put holes on the bottom of the pot. Holes also help drain excess water and prevent root rot. To add holes I used a screw as it was the first thing I found that was sharp; it was quite handy to get the holes to the size I wanted them. (Anything that's sharp enough to get through the plastic would work).


To make the pot look less like a coleslaw pot I grabbed some parcel string and glue. Any sort of string or yarn can be used for this, whatever looks good. I put glue on the pot then wrapped the string around the pot in a spiral every-so-often pushing all the string together to make sure plastic didn't  show. 


I didn't wrap the string all the way to the bottom of the pot as the bottom would get wet. 


I had some spare yarn so tied this around the top to make a bow. 


The end.


Comments

Popular posts from this blog

Crochet Waistcoat (with link to free pattern)

I love waistcoats and have spent a lot of time looking for a crochet waitcoat pattern that I actually like. When came across one that I would actually wear I added it straight to my to do list! I think it is quite smart and simple looking (just the way I like things). Here it is: This is the first piece of clothing that I have made and I really like the way it has turned out. The patterns is well written and easy to follow, however I did have to keep trying the waistcoat on as I was making it because I have a very small build and most 'normal' sized clothes do not fit me. After making a few adjustments to the pattern the waistcoat fits perfectly. It is so comfortable and looks great over a shirt, I have had a few compliments whilst wearing it so overall a great make. The pattern is quite simple as far as clothes patterns go, it took me about two days to make, I probably could have done it in one day if I had the time. Find the pattern  Here . Find other clothing po...

Crochet Sorting Hat

A very Harry Potter obsessed friend wanted me to make her a Sorting hat. It was pretty good timing to be honest as I am currently re-reading the Harry Potter books at the minute, I read them when they first came out and had the urge to re-read. I do however need to get my hands on the films just so I can compare the books to the film just for my own interest. I've never really been interested in the films. Here is the finished product: The pattern (below for link) I used is ace and really easy to follow however when I made it the first time it was way too small. At the end of the pattern it says to add extra rounds and increases until the hat fits. If I had have done this the face would have been a really small face right at the top of the hat that would just have looked utterly wrong. I used chunky yarn as suggested in the pattern however I did not have the size hook that was suggested so I used the size down but made loose stitches. Anyway, as I said, it turned out sma...

Hamster DIY - Suspended Crochet Bridge

To make this bridge I used all natural Jute string a 5.5mm crochet hook. I made the stitches  VERY  tight so that Tims little paws wouldn't get stuck in any gaps, this took quite a bit of effort as the Jute string is very stiff.  SC- Single Crochet Chain 14  (or as many needed to made the bridge wide enough)  Row 1: SC in each chain along, turn Row 2 - 35: SC in each stitch along, turn (add or decrease the amount of rows to create a longer or shorter bridge) Finish off.  Tie a length of string to each corner of the piece to make supports and hang securely in the cage. To make the supports stronger I used two pieces of string in each corner and tied the pieces together all the way along.  Safety! Only use materials that are safe for a hamster. Make sure there are NO gaps for little feet to get caught in. Don't hang the bridge too high from the ground and make sure there is lots of soft bedding beneath the bridge in...