I have recently got into drinking green smoothies. Mostly due to the fact that I hardly used to eat any fruit and wanted to get some into my diet. If I'm getting fruit into my diet why not make the smoothie even more nutritional by adding some greens too? Adding greens to my smoothie was something I was very uncertain about because I thought that it would taste nasty, but surprisingly I actually like it.
I like to drink my smoothies in a morning as my breakfast I guess (I don't generally eat breakfast). However I start work at 6am and using a blender at 5:30 in the morning would not be so pleasing to the neighbours, or my other half...To work around this I have recently started making my smoothie the day before, at a more reasonable time, and freeze it overnight. Then take the frozen smoothie to work, allow it to defrost and have a lovely cold smoothie a few hours later. (If you are going to freeze smoothies in glass jars do not fill the jar to the top, leave about a third space at the top otherwise the jar will crack and cause a frozen glassy mess).
The jar cover came into mind due to green smoothies not always looking particularly appealing and I didn't want people continually asking me what was in my jar. So, to make the jar more appealing to the eye I made a crochet cover for it and now nobody at work judges me on what I'm drinking!
To make the cover all I did was UK double crochet (US single crochet) in rounds making sure that the cover fit the jar comfortably, increasing and decreasing when needed. I used scrap yarn for my cover, I will be making more soon.
What motivated me to drink lots of smoothies was this website: www.simplegreensmoothies.com/, they have smoothie challenges 4 times a year. This includes shopping lists and recipes motivating you to drink a smoothie every day for 30 days. What's amazing is that it's free to join which means many many smoothie recipes for free! The next challenge starts 1st July so get on it. Even if you don't want to join the challenge check out the website for recipes, blending tips and more.
I like to drink my smoothies in a morning as my breakfast I guess (I don't generally eat breakfast). However I start work at 6am and using a blender at 5:30 in the morning would not be so pleasing to the neighbours, or my other half...To work around this I have recently started making my smoothie the day before, at a more reasonable time, and freeze it overnight. Then take the frozen smoothie to work, allow it to defrost and have a lovely cold smoothie a few hours later. (If you are going to freeze smoothies in glass jars do not fill the jar to the top, leave about a third space at the top otherwise the jar will crack and cause a frozen glassy mess).
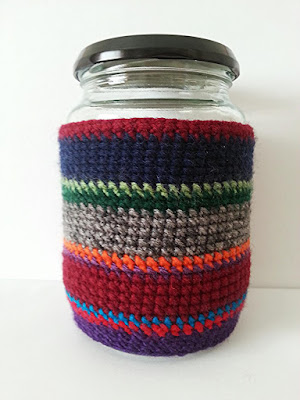
The jar cover came into mind due to green smoothies not always looking particularly appealing and I didn't want people continually asking me what was in my jar. So, to make the jar more appealing to the eye I made a crochet cover for it and now nobody at work judges me on what I'm drinking!
To make the cover all I did was UK double crochet (US single crochet) in rounds making sure that the cover fit the jar comfortably, increasing and decreasing when needed. I used scrap yarn for my cover, I will be making more soon.

What motivated me to drink lots of smoothies was this website: www.simplegreensmoothies.com/, they have smoothie challenges 4 times a year. This includes shopping lists and recipes motivating you to drink a smoothie every day for 30 days. What's amazing is that it's free to join which means many many smoothie recipes for free! The next challenge starts 1st July so get on it. Even if you don't want to join the challenge check out the website for recipes, blending tips and more.
Enjoy this post?
Comments
Post a Comment