Privacy Policy

Wednesday, 25 September 2019

DIY Crochet Plant Hangers (in recycled pots)

I have recently become a little obsessed with plants. Mainly houseplants at the moment with a mini jungle that I have started. Here's a small section:


As my plants have got bigger and created 'pup' or baby plants I needed somewhere to put them and I wanted it to be somewhere decorative and pretty. Who doesn't love to show off baby plants?!

I had three glass pots that were previously dessert pots. I keep a lot of glass jars ect because I prefer glass to plastic for storing things and these glass desert pots were dinky and cute, don't judge me.

So i decided to use these as small plant pots for the baby plants. Yes I know plants should all be in pots with drainage holes but these are just temporary pots whilst the plants establish themselves a little before being placed in their permanent pot/position. Now, I'm slowly running out of windowsill space for plants thus needing to find somewhere else for the babies. With my crocheting skills I crocheted some hanging pots to hang on my wall that way they are out of the way and not only look really cute but perfectly match my DIY yarn curtain.


I just crocheted around the pots using double crochet in the back loops only to create a bit of an interesting texture and look. There is still one pot to fill which will soon be filled with this little guy:


Hook off. 


Enjoy this post?

Wednesday, 11 September 2019

Mini Octopus Amigurumi

I went to see Stephen Fry in London on his 'Mythos a Trilogy' tour. The show was everything I had hoped for, as he hasn't been on tour in about 40 years this was something I couldn't miss. I find Stephen Fry very relaxing to listen to on audiobooks so when his show was mostly of him sitting in a chair reading different parts of his book 'Heroes' I was very pleased. Obviously there were a few quips intermingled with the discussions of his book which rounded off the show really well. I'd love to see him on tour again.

Anyway back to crafting. The drive to the show was quite long so for entertainment I took a small pattern with me to crochet in the car. I struggle finding time to craft from September through to May as I'm studying for university alongside my full time job so I have to make the most of every spare second I get (which is not a lot). Therefore crocheting whilst travelling is perfect.

The pattern is quite easy to follow and relatively quick. It is a little fiddly though as it is teeny tiny.


The pattern can be found Here.

I used DK yarn a 3mm yarn hook and 4mm black beads for the eyes. Finished size is 1.5 inches long, deep and wide.


Enjoy this post?

Wednesday, 28 August 2019

Crochet Calcifer Pattern


'May all your bacon burn'

I made Calcifer a while ago find the post here. I have since been asked to make more on request so whilst making the most recent one I decided to write down the pattern. Now I have it to hand if any more requests come through. So I am sharing my pattern here. If you do use this pattern please link any photos/blog posts ect back to my pattern so that others can enjoy it too!

Things I used:
  • DK yarn (yellow, orange and red)
  • Scissors
  • Stitch marker
  • 3mm crochet hook
  • yarn needle
  • Two 4mm black beads 
  • Clear thread (or white thread to sew on the beads) 
  • White felt 
  • Toy Stuffing
  • Pet brush
Pattern: 
sc = single crochet
dc = double crochet 
tc = triple crochet
ch = chain 

Begin with yellow yarn - chain 6 and create a magic ring:
Round 1: 2 sc in each stitch around (12 stitches).
Round 2: *sc in next stitch, 2 sc in next stitch* repeat around (18 stitches).
Round 3: *sc in next two stitches, 2 sc in next stitch* repeat around (24 stitched).


Change to orange yarn:
Round 4: *sc in next three stitches, 2 sc in next stitch* repeat around (30 stitches).
Round 5: *sc in next four stitches, 2 sc in next stitch* repeat around (36 stitches).
Round 6: *sc in next five stitches, 2 sc in next stitch* repeat twice, ch 1, dc in next two stitches, sc in next stitch, ch 1, dc in next stitch, tc in next stitch, 2 tc in next stitch, dc in next stitch, sc in next stitch, ch 1, dc in next three stitches, 2 sc in next stitch, *sc in next five stitches, 2 sc in next stitch* repeat twice. (42 stitches).


Change to red: 
Round 7: *sc in next six stitches, 2 sc in next stitch* repeat around (48 stitches).


Finish off leaving a long red tail for sewing the two sides together. Repeat from the beginning to create side number two, finish off (this side doesn't need a long tail).  I fasten all the ends off but don't bother sewing them in to hide the ends as they will be hidden within the amigurumi anyway. The less sewing the better right?


Sew the two sides back-to-back using the long red tail leaving a small gap.


Push all the loose ends into the the middle of the arigurumi whilst adding the stuffing through the small gap. When your happy with the level of 'squishiness' sew the gap closed and finish off. 

Now take a deep breath, pick up that pet brush and brush and brush and brush and brush the yarn all over in every direction until your happy with the overall fluffy appearance (I used a normal hair brush the first time I made Clacifer, I swear it took 20x longer). Finishing off by brushing it up towards the top of the amigurumi so that it looks like fire. 

Cut small circles of white felt for the eyes and sew these on the arigurumi with the small beads (as shown below). Finally, using red yarn sew on a small mouth. The finished product is 2.5 inches wide, 3 inches high and 1.25 inches deep.


N.B. Don't worry too much about little mistakes as the brushed yarn hides small mistakes really well.

For other Ghibli posts select Here.

Hook off. 

Enjoy this post?

Wednesday, 7 August 2019

DIY Yarn Curtain


My partner and I recently bought a house. The previous owners liked open spaces so they knocked down a wall to create a larger living space and removed a door that was not longer required. However, instead of filling the door in completely they installed a window. This window is between the hallway and the living room so people entering the house can see into the living room when entering the front door. Being a person who likes my personal space, this window is a pain. I don't want people at the front door looking in at me sitting on the couch minding my own business. I'm not sure what the thought process behind the window was, it's an interesting characteristic but not really practical. Anyway, instead of getting rid of the window and filling in the wall I decided 'cover it up'.

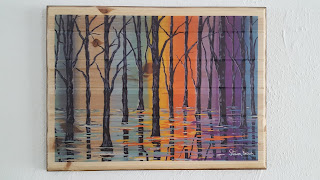
Using homegrown bamboo and twine (for the rustic look I like) and colourful yarn to go with the decor of the room I made a curtain. I based the yarn  on some of the colours in a Steven Brown painting 'Forest of Argyle' that we bought before buying the house:


Making the curtain was really simple just tying lengths of yarn onto some bamboo. It did however take longer than I expected. But I love how it looks.


The yarn looks really nice when the light from the hallway shines through. To add a bit more interest I made a simple macrame plant holder to hang my spider plant. 


You can just about see another Steven Brown painting peeping in on the left bought for me by my lovely Grandparents. 

Hook Off. 

Enjoy this post?

Wednesday, 24 July 2019

Crochet monkey

I was given a crochet craft as a gift; 'Get Crafty Crochet Cheeky Monkey Kit' by Hobbycraft. I have never made a crochet item from a kit before. Everything was included; the yarn (perhaps enough to make two monkeys), a crochet hook, a stitch marker and stuffing (only enough for one monkey). There was a nice little instruction booklet with pictures and good, easy to understand instructions however, I'm not sure an absolute beginner would be able to follow the instructions, some knowledge of stitches and reading patterns would be required.

My favourite part of the pattern were the hands/feet. I have never crochet hands before and I love them they are really well thought out, I may steal the idea for future patterns if ever I need to make hands. My only issue with the pattern, which is a personal preference rather than a problem with the pattern, was that the head of the monkey ended up rather heavy for the body. The head's attached to the body with a very thin 'neck' so it's rather floppy. This may be fine for some, but I prefer less head wobble. But everyone to their own!

All in all the kit was brilliant, I still use the stitch marker and hook, the quality isn't bad. The yarn itself isn't the easiest to crochet with as the strands had a tendency to separate which could be tricky and frustrating for the inexperienced but with that being said I would definitely recommend the kit.

The monkey now has a new home with my friends son.


Enjoy this post?

Wednesday, 10 July 2019

C2C crochet Wolf blanket

After giving a C2C graph blanket a try for 60 million trebles I fell in love with the ability to make any pattern possible with a little bit of thought and planning. I also find the C2C graph fun, interesting and slightly challenging to make. The wolf blanket is the biggest blanket I have made so far and it took me about a year to make in between work, uni, buying (and doing up) a house and what little life I manage to squeeze into all that. The worst part for me was all the ends I had to sew in and I mean ALL the ends, so so so so many ends and I HATE sewing! Putting that part aside I loved making this.


Just to put the size of the blanket into perspective here is a terrible picture of my double bed: 


Hook off.

Enjoy this post?

Wednesday, 26 June 2019

Mermaid Tail Lip Balm Pouch

I always find that I loose my lip balms somewhere in my bag and generally give up trying to find it and just put up with dry lips for the day. That was until I found and ingenious idea of creating a little pouch on a keyring that is the perfect size for a stick of lip balm. I also find that the best type of crochet is practical crochet. 

A friend of mine loves mermaids and anything to do with sea-life, so as I like to mash ideas together I had a quick look to see if there was a lip balm mermaid pouch. To my surprise there was! I based my mermaid pouch on this mermaid tail chapstick holder.


I chose to add a flap and bead to close the pouch just to make sure that the lip balm wouldn't get lost. Determination for no more dry lips! I also like the look of the bead on the pouch, it reminds me of a pearly shell.

Hook Off.

Enjoy this post?

Wednesday, 12 June 2019

Crochet Weeping Angel

I made this weeping angel some time ago as a gift, however the gift didn't get given until recently. The angel has been getting comfy on my fireplace for a long time. I think I'm actually going to miss it.

I love Dr Who and I think the first episode involving weeping angels is my favourite Dr Who episode...so making this was quite exciting for me (I don't care how sad that sounds).

The angel was quite easy and quick for me to make until it got the the hair. I absolutely hated making the hair of this angel. It involved a lot of precise and neat sewing that, as a perfectionist, took me ages. Enough said. However the detail of the end product does look really good so it is worth the pain. 


The pattern can be found Here

Hook off. 

Enjoy this post?
Wednesday, 29 May 2019

Dream catcher

I had a quick try at Tunisian crochet a while ago for my Afghan stitch charity square. I wanted to give afghan crochet another go for something small. I came across some lovely Tunisian crochet feathers that I had the urge to try. When I made the Tunisian crochet square I wasn't happy about the way the square curled upon itself when finished, however a feather with a bit of a curl sounded perfect. But what to use them for?

My love of dream catchers started when I was very young. I just like the way something so simple can be made into something so pretty. I also have an affection for trees. One of my favourite trees is the Japanese Maple, which I happen to have in my garden, it changes gradually from orange to green, beautiful (such a nice surprise to find this gorgeous tree after I moved in to my house!).

Anyway back to the point. I wanted to mash together two things that I love, dream catchers and trees. I roughly followed the tree of life wire crafts that can easily be found with a quick internet search. I decided to use items I had around the house. The base to my dream catcher is a little strange...I used the lid of a Haribo tub with the centre cut out. Cutting out the centre was not easy but I managed! I used twine to create the main tree shape (which was very tricky to master with just two hands). I wrapped the yarn I used to make the feathers around the twine to add a subtle colour with beads attached for more interest.


I am quite happy with the result, I like the more natural/earthy look that twine gives.

The pattern for these feathers can be found here.

Hook Off. 

Enjoy this post?